Пользователь
- Сообщения
- 3
- Реакции
- -1
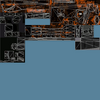
Я переделал UV map для стандартных текстур, и в финальном изображении заметно упало качество текстуры.
Есть ли версия стандартного скина с хорошо сделанным UV map? Потому что если я делаю это в Blender автоматически, то каждая грань будет проецироваться на текстуру.
На стандартных моделях есть много граней, которые используют одну и ту же часть текстуры. Например, обе стороны AWP могут использовать одну и ту же часть текстуры, а оригинальная текстура прицела размером примерно 64x64, а новая гораздо больше.
Есть некоторые преимущества в наличии кастомной текстуры для каждой грани, но я просто хочу работать со стандартными моделями.
Мой вопрос: есть ли хороший репак стандартных моделей, который использует одну текстуру с продуманным UV map?
Если нет скинпака, в котором это уже сделано, можете порекомендовать хороший туториал по созданию UV map? Я делаю всё с нуля, у меня нулевой опыт в Blender и моделировании.
I remade the UV map for default textures and there's a noticeable texture quality drop in the final image.
Is there a version of the default skin with a well done UV map, because if I do it in blender automatically, it will map every face to the texture.
There are many faces on the default models that use the same part of a texture. What I mean is that both side of the AWP for example could use the same part of the texture, the original scope texture is like 64x64 and this new is way bigger .

There are some benefits to having custom texture for every face, but I just want to work with the default models.
My question, is there any good repack of the default models that use 1 texture with a well thought out UV map?
If there's no skinpack that done this, could you guys can recommend me a good tutorial on UV map making, I'm doing with 0 experience on Blender and modelling.


